Quick answer: How should a bicycle helmet fit?
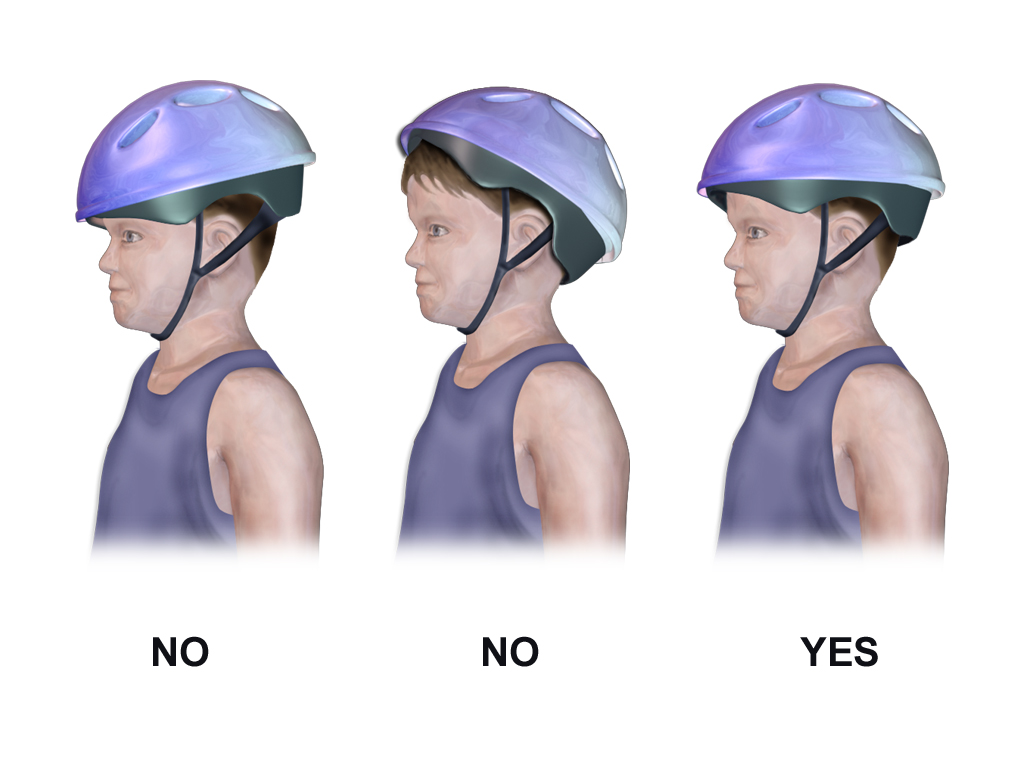
A helmet should sit level, low on your forehead—about one or two finger-widths above your eyebrows—and feel snug without being painfully tight. The side straps should form a V around each ear, and the buckled chin strap should be snug. When checked, the helmet should not shift enough to uncover your forehead or obstruct your vision. Follow your helmet’s instructions for its particular adjusters. (nhtsa.gov)
You can make these checks before getting on the bicycle. Use a mirror or ask someone to help: it is easier to spot an uneven strap or a helmet tilted backward from another angle. NHTSA specifically recommends a mirror or another person when adjusting fit. (nhtsa.gov)
This guide covers ordinary bicycle helmets for everyday and recreational pedal cycling. It is a fitting checklist, not a test of how a helmet will perform in a crash. No helmet, including one that fits correctly, can prevent every injury. (retailerassetsprd.blob.core.windows.net)
1. Check the helmet’s intended use and certification
Before adjusting anything, confirm that the helmet is intended for bicycle riding. A helmet made exclusively for another activity is not automatically suitable for cycling. CPSC distinguishes bicycle helmets from helmets marketed exclusively for activities such as baseball or roller hockey. (cpsc.gov)
For readers in the United States: look inside for a label stating that the helmet complies with the U.S. Consumer Product Safety Commission’s bicycle helmet safety standard. CPSC advises against using a bicycle helmet without that compliance label. The federal requirements cover matters including impact performance, retention-system strength and positional stability. (cpsc.gov)
For riding elsewhere, check the helmet requirements published by the relevant local authority and confirm that the helmet’s labeling meets them. Do not assume that a label accepted in one market settles the requirements everywhere. Helmet-use rules also vary by location. (trekbikes.com)
Treat certification, fit and condition as separate checks. A compliance label does not tell you whether the helmet fits your head or whether it has suffered damage. Likewise, price and appearance are not substitutes for those checks, and no safety equipment protects against every possible crash. (cpsc.gov)
2. Measure your head, then try the appropriate size
Use a flexible tape measure, or a piece of string that you can measure against a ruler. Measure horizontally around your head, across your brow and above your ears. Compare the result with the sizing chart for the helmet you are considering. (trekbikes.com)
Do not select a size solely because another helmet was labeled “medium.” NHTSA notes that sizes can vary between manufacturers. Your measurement narrows the choices; trying the helmet on establishes whether it actually fits. (nhtsa.gov)
Worked sizing example: suppose your head measures 56 cm. Trek’s published general sizing chart lists both small, at 51–57 cm, and medium, at 54–60 cm. That measurement falls within both ranges; it does not identify a universal winner. Use the chart for the exact model, then compare comfort, position and stability. These ranges are an example, not a sizing recommendation for other brands. (trekbikes.com)
The aim is a fit that feels secure and comfortable, not one that requires excessive tightening. If the first helmet does not work, try another size or model rather than assuming that every helmet in your measured range will feel the same. (trekbikes.com)
3. Position it level and low over your forehead
Put the helmet on in the orientation shown in its instructions. Before tightening the straps, position it level on your head, with the front edge about one or two finger-widths above your eyebrows. It should cover your forehead rather than perch on the back of your head. (nhtsa.gov)
Check the position in a mirror:
- Is the front edge low over your forehead?
- Is the helmet level rather than tipped backward?
- Does the position match the manufacturer’s fitting illustration? (nhtsa.gov)
Common mistake: exposing the forehead. A helmet tilted backward can feel comfortable while sitting in the wrong position. Bring it forward to the correct position before making other adjustments. Tightening straps around a badly positioned helmet is not the starting point NHTSA recommends. (nhtsa.gov)
If the helmet cannot sit correctly and comfortably, reconsider the size or model. Do not accept an uncovered forehead simply because the buckle closes. (nhtsa.gov)

4. Adjust the rear fit system without overtightening
Many helmets have a rear dial or another adjustment mechanism that changes the fit around your head. This is separate from the chin strap. Some models also allow adjustment of the rear system’s height, but the mechanism varies; follow the instructions that apply to yours rather than forcing an unfamiliar part. (retailerassetsprd.blob.core.windows.net)
With the helmet level, adjust the fit system—or manufacturer-supplied sizing pads, where applicable—until the helmet feels snug. It should feel secure, not painfully tight. (nhtsa.gov)
NHTSA’s “Be a Roll Model” guidance suggests gently shaking your head before buckling the chin strap. If the helmet shifts substantially from side to side, it may need further adjustment or a smaller size. This is an initial fit check, not permission to ride with the strap unbuckled. (nhtsa.gov)
Also check what is underneath it. Trek’s manual warns that caps, scarves, bulky hairstyles and other objects can affect protection or allow movement. Follow your manufacturer’s guidance rather than assuming that the same adjustment works with every hairstyle or head covering. (retailerassetsprd.blob.core.windows.net)
5. Arrange the side straps and fasten the chin strap
On a conventional adjustable strap system, the straps should form a V under and slightly in front of each ear. Adjust both sides, and lock the dividers if the design provides a locking mechanism. (nhtsa.gov)
Keep the straps flat rather than twisted. Some helmets have fixed dividers or different buckle designs, so do not force them to behave like another helmet’s hardware. Consult the manufacturer’s instructions when the arrangement differs. (trekbikes.com)
Then:
- Fasten the buckle using its specified method.
- Check that it is fully engaged.
- Adjust the chin strap until snug beneath your chin.
- Secure excess strap through the supplied keeper as instructed. (trekbikes.com)
NHTSA’s fitting guide uses room for no more than one or two fingers under the chin strap as a practical check. The strap should not hang loosely, but it should not need painful tightening to hold the helmet in place. (nhtsa.gov)
The rear adjuster and chin strap have different jobs. Complete both adjustments; a tight rear dial is not a replacement for fastening the buckle. (trekbikes.com)
6. Test whether it stays in the correct position
With the buckle secured, gently grasp the helmet and try moving it forward and backward. A correctly fitted helmet should remain comfortable and should not move forward enough to obscure your vision or backward enough to expose your forehead. (trekbikes.com)
Next, check for side-to-side rocking. NHTSA advises that the helmet should not rock forward, backward or sideways on your head. (nhtsa.gov)
Finally, open your mouth wide as if yawning. NHTSA’s fitting guide says the helmet should pull down on your head; if it does not, revisit the chin-strap adjustment. (nhtsa.gov)
These checks are useful for finding fitting problems, not for reproducing a crash. If adjustment cannot keep the helmet in position, stop and ask a knowledgeable retailer for help, or try another helmet. Do not keep tightening until discomfort masks the problem. (trekbikes.com)
7. Troubleshoot a helmet that tips or slides
Example: the helmet slides backward during the check. You initially position it correctly, but a gentle backward movement exposes your forehead. The fit is not ready for riding. For the adjustable strap arrangement shown in NHTSA’s guide, the correction is to unbuckle, shorten the front strap by moving the slider forward, then buckle, readjust the chin strap and repeat the check. Use your own manual if its system differs. (nhtsa.gov)
Example: it tips forward toward your eyes. NHTSA’s illustrated arrangement calls for adjusting the rear strap by moving the slider back toward the ear, then rebuckling and retesting. Do not solve this by leaving the whole helmet permanently tilted backward. (nhtsa.gov)
Other mistakes to avoid include:
- Trusting the size label alone: fit still needs checking on your head.
- Checking only the front view: use a mirror or helper to inspect the straps.
- Accepting persistent movement: readjust or seek fitting help rather than riding with an unresolved problem. (nhtsa.gov)
8. Check condition and replacement needs before riding
A helmet can fit well and still need replacement. CPSC identifies cracks, worn straps and missing pads or other parts as reasons to replace a helmet, and warns that impact damage may not be visible. (cpsc.gov)
Replace a helmet after a crash rather than relying on its outward appearance. Follow its manufacturer’s instructions for other impacts, care and age-related replacement. Trek, for example, publishes its own replacement interval; that is not a universal schedule for every manufacturer. (trekbikes.com)
Before each ride, repeat the essential checks: correct position, secure buckle, snug straps and stable fit. Readjust when necessary rather than assuming that the first fitting remains correct indefinitely. (nhtsa.gov)
The practical takeaway: choose an appropriately labeled bicycle helmet that fits your head now, adjust it in the correct position, and confirm that it stays there. If fit, condition or impact history leaves you uncertain, resolve that uncertainty before using it. Correct fit supports the helmet’s intended function; it cannot guarantee freedom from injury. (cpsc.gov)